Suitable for Electric bike with 36V battery and using 42V 2A charger.
E-bike Conversion Kit - easy to convert your bike to an electric powered scooter/moped
Dual Mode Controller: Motor works under Hall effect & non-Hall effect(For 1 mode controller, the motor only works under Hall effect, if hall components inside the motor break down, the motor will stop working. But for our controller, if the components break down, it'll switch into non-hall effect mode, the motor will still be working.)
300W powerful brushless gearless hub motor with 25KM/H top speed
Drive system without moving chains or gears - no friction, more efficient, less chance to break
The brake shuts off motor automatically - saves energy and improves safety
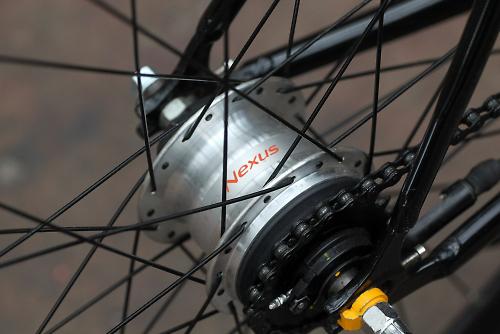
Just purchased a rare chainless bike with an enclosed shaft transferring power from pedals to the 7 speed Nexus rear wheel hub.
The Shimano seven-speed hub gear is superbly practical and fuss-free, with a wide enough range of gears that it'll suit even fairly hilly terrain. Bolt-up hubs help deter thieves but you'll have to carry a 15mm spanner, just in case.
From a Road cc review:
2 Hub gears are grrrrrr-eat!
For a round-town bike hub gears have so much going for them, it's a mystery anyone would use derailleurs. Click, shift and away you go with no need to worry about a fragile dangling gear change mechanism getting covered in road grime. That'll be especially nice in the winter.
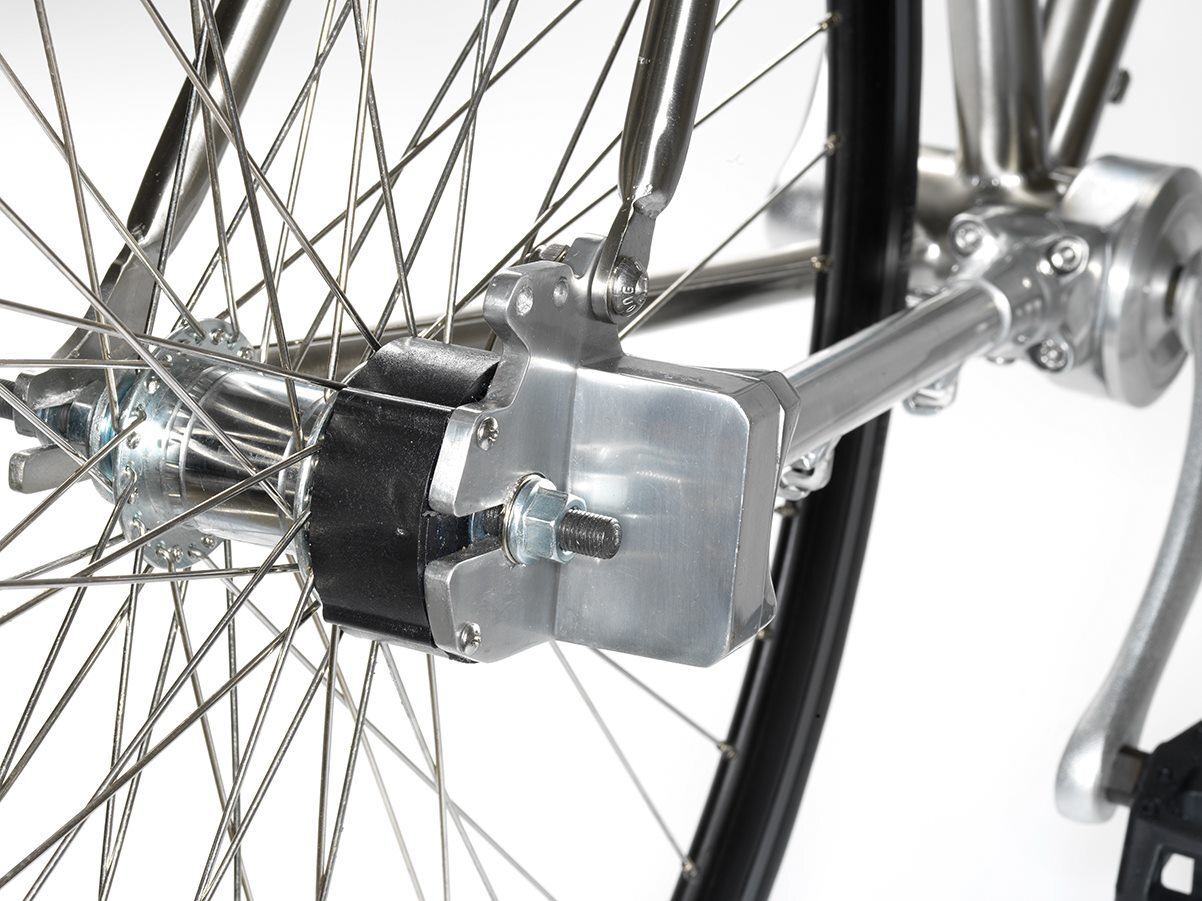
The shaft drive is similar to the one used on some current high end bikes.
Stainless steel, shaft-drive ESO Bike is made for no-fuss cycling
For just ripping around town, many cyclists prefer simple, low-maintenance bicycles. The ESO Bike is designed with that in mind, as it lacks a chain, cables, gears, brake pads and paint, plus it should never rust or get flat tires.
Instead of a chain – or a belt drive – the ESO features a fully-enclosed shaft-drive drivetrain. This means that not only are lubrication and cleaning unnecessary, but riders also won't have to contend with their pant legs getting grease-stained or caught in the chain.
Because there's only one gear, there are no shifters, derailleurs, gearboxes or the associated cables. There are also no brake levers or cables, thanks to the use of a single rear coaster brake – that's the type that you push back on the pedals to operate. The lack of cables minimizes both clutter and maintenance, since brakes (non-hydraulic ones, at least) and derailleurs usually need to be adjusted as their cables stretch with use.
A close look at the ESO Bike's shaft drive setup
Brant Stock
Flat tires and tire-pumping shouldn't be an issue, as the ESO utilizes Tannus Aither 1.1 solid tires mounted on 48-spoke deep V double-wall rims. These tires are said to provide a ride feel similar to that of pneumatic tires inflated to 100 PSI (6.9 bar). It should be noted, though, that solid tires typically are heavier than their conventional counterparts.
And finally, because the ESO has an unpainted stainless steel frame, paint chips and rust are out of the picture. Finger-oil smudges and whatnot are another story, so riders might want to invest in a nice soft polishing cloth.
Should you be interested, the ESO Bike is currently the subject of a Kickstarter campaign. A pledge of US$1,400 will get you one, when and if they reach production – its planned retail price is approximately $1,500. The bike weighs a claimed 29 lb (13 kg) and is only available with a 56-cm frame, which should fit buyers ranging from 5'6" to 6'2" (168 to 188 cm).
Sports Outdoors Commuter City Road Bike Bicycle Mountain RS200 700C Chainless Road Racing 3 - Gear Shaft Drive Retro Bicycle Aluminum Alloy Hard Frame
?Gifts: A Set of Tools, Bottle Holder, Lock, Pump. Brand Name: . Wheel Size: 700C. Load Capacity: 120kg.
You'll be quick and agile on the road with bike. The hollow-chamber rims provide stability even at high speeds brakes ?This bike will become your faithful companion in everyday life, whether at work or in your leisure time
With the warm weather drawing to an end I bought myself a bike for the coming snow season. The fat 4 inch wide tires on this bike are inflated to 65 psi to minimize rolling resistance but I am planning to reduce that by quite a bit and use the bike for biking on snow packed trails this coming winter.
My upgraded Hybrid Bike with 1000 Watt front wheel hub and 48 Volt Lithium- Ion Battery.
New 44 tooth Rear Sprocket mounted with a 1 inch machined Hub Adapter.
After only a short period in service it was discovered that the adapter was slipping on the 1.00 inch hub and the sprocket connecting bolts were contacting the adjacent spokes. A solution to this problem still eludes us at this time.
*Sprocket Number of holes: 4 holes Pitch: 46mm (Adjacent hole center distance) Diagonal: 65mm (Diagonal hole center distance) Hole diameter: 6mm Number of teeth: 54 Inner diameter: 54mm (Approx) Outer diameter: 141mm (Approx) Thickness: 4mm (Approx) Weight: 340G (Approx)
Real 500W 12-230-380 V converter with HIGH FREQUENCY output. The output is not usable without rectification and 50-60 Hz switsh ( full bridge type). When coupled with 100-120 Hz PWM, even a pure sine wave is achievable, the quality of transformer and transistors is optimal. In that case the built in oscillator has to be disconnected, and several of these units can be stacked. So this is a device which can be altered in what you want when you are aware of the implications. 4 Stroke Engine Installation with Battery Charger: Lifan
chain
Full 360° any position operation for usage and storage in any position
4-stroke single cylinder air cooled engine
Non-contact transistorized ignition (TCI)
50-state-Canadian sales compliant
35 ml overhead cam engine
Eliminates mixing oil and gas
800-Watt - 1000-Watt at 6500 RPM
8.5 to 1-compression ratio
0.1 l oil capacity
0.65 l fuel tank
1.5 horsepower
9 lbs. dry weight
Recoil start
4 - 1 Gear Reduction Transmission
Sprocket 14 T
Starter Gear Reduction 6 - 1
Sprocket 12 T
Rear Wheel Sprocket 54 T
At 6500 engine rpm electric motor turns at 6300 rpm
At 3600 rpm Bike wheel rotates at 406.25 rpm
Wheel diameter 26 inches or .6604 meters
Maximum speed at 6500 rpm is 50.57 kph
Wheel Building Made Easy:
Wheel building is considered something of a dark art, so we’re breaking it down into two parts: lacing them, then tensioning and truing them. Follow our step-by-step guide and you’ll throw yours together in a snap…
Time: 30-60 mins
Cost: rims, hubs, spokes
Tools you’ll need
Spoke key
Medium flat blade screwdriver
Tools: toolsBikeradar
1] Get measured up
Your first job is to get the right length spokes handy.: your first job is to get the right length spokes handy.Bikeradar
Your first job is to get the right length spokes handy. Measuring at home is impossible, so it’s best to drop into your local shop with your rims and hubs to ask them to measure them for you. Alternatively, you can go to www.dtswiss.com and use the spoke calculator to work it out. Separate the spokes out into four clearly marked containers – front disc side, front non-disc side, rear disc side and rear drive side.
2] Assemble the rear wheel
Holding the rear hub so it hangs vertically, drop a disc side spoke downwards into the disc side flange.: holding the rear hub so it hangs vertically, drop a disc side spoke downwards into the disc side flange.Bikeradar
Holding the rear hub so it hangs vertically, drop a disc side spoke downwards into the disc side flange. Now sight the first hole on the drive side flange that’s counter clockwise from where the other spoke is, dropping a drive side spoke downwards into it. Get your rear rim and place it nearby – you’ll need it for the next step.
3] Separate your spokes
Separate the spokes and insert the disc side spoke into the eyelet on the rim that’s next to the valve hole (counter-clockwise).: separate the spokes and insert the disc side spoke into the eyelet on the rim that’s next to the valve hole (counter-clockwise).Bikeradar
Holding the hub disc side up and the rim horizontal, separate the spokes and insert the disc side spoke into the eyelet on the rim that’s next to the valve hole (counter-clockwise). Now place the other spoke into the eyelet directly counter clockwise (heading away from the valve hole) to the first one. Thread the nipples on a couple of turns to hold it all in place.
4] Threading by numbers
With the hub disc side up, count seven holes clockwise from the spoke in the disc side flange.: with the hub disc side up, count seven holes clockwise from the spoke in the disc side flange.Bikeradar
With the hub disc side up, count seven holes clockwise from the spoke in the disc side flange and insert a new spoke up through that seventh hole. Insert the spoke into the rim two eyelets clockwise from the valve hole. Screw a nipple on a couple of threads as before.
5] Game, offset and match
Keeping the hub disc side up, count another seven holes clockwise from the spoke in the drive side flange.: keeping the hub disc side up, count another seven holes clockwise from the spoke in the drive side flange.Bikeradar
Keeping the hub disc side up, count another seven holes clockwise from the spoke in the drive side flange (it should be slightly offset from the disc side spoke you inserted in step 4). Insert a spoke up through that seventh hole and then place the spoke into the open eyelet on the rim found next to the valve hole. Screw a nipple on a couple of threads.
6] Hot crossed spokes
Thread another spoke downwards through the hole two spaces clockwise from the one already downwards in the hub.: thread another spoke downwards through the hole two spaces clockwise from the one already downwards in the hub.Bikeradar
With the hub still disc side up, thread another spoke downwards through the hole two spaces clockwise from the one already downwards in the hub (see step 2). Put the spoke into the rim four eyelets clockwise from the valve hole, lacing it over the spoke it crosses. Screw a nipple on and repeat this (apart from the spoke crossing) around the wheel. Each spoke should go in the fourth eyelet clockwise from the previous one.
7] Finish the side
Complete this side of the wheel by inserting a spoke up through the flange two holes counter clockwise from the one already upwards.: complete this side of the wheel by inserting a spoke up through the flange two holes counter clockwise from the one already upwards.Bikeradar
Complete this side of the wheel by inserting a spoke up through the flange two holes counter clockwise from the one already upwards (see step 4) in the hub. Put the spoke into the rim three eyelets counter-clockwise from the valve hole, lacing over the first two spokes and under the third. Screw a nipple on and then duplicate this around the wheel with each spoke going into the fourth eyelet counter clockwise from the previous one.
8] Assemble the drive side
As you assemble the drive side you may need to flex already fixed spokes out of the way.: as you assemble the drive side you may need to flex already fixed spokes out of the way.Bikeradar
With the disc side down, repeat steps 6 and 7. As you assemble the drive side you may need to flex already fixed spokes out of the way, or tweak the ones you’re putting in, to get new spokes them past successfully. When you’re finished, put the rear wheel to one side without tightening the nipples.
9] The front wheel
Get the font wheel hub and, holding it vertically, drop a disc side spoke downwards into the disc side flange of the hub. : get the font wheel hub and, holding it vertically, drop a disc side spoke downwards into the disc side flange of the hub.Bikeradar
Get the font wheel hub and, holding it vertically, drop a disc side spoke downwards into the disc side flange of the hub. Sight the first hole counter clockwise in the flange on the other side from where the first spoke fell, then insert a non-disc side spoke upwards through it. Place the rim nearby, you’ll need it for the next step.
10] Get lacing
Separate the spokes and insert the one in the disc side into the eyelet next to, and counter clockwise from, the valve hole.: separate the spokes and insert the one in the disc side into the eyelet next to, and counter clockwise from, the valve hole.Bikeradar
Holding the hub disc side up and the rim horizontal, separate the spokes and insert the one in the disc side into the eyelet next to, and counter clockwise from, the valve hole. Then place the non-disc side spoke into the hole directly counter clockwise to that one. Thread the nipples on a couple of turns.
11] Lucky seven
Count seven holes clockwise from the spoke in the disc side flange, then insert a spoke up through that seventh hole.: count seven holes clockwise from the spoke in the disc side flange, then insert a spoke up through that seventh hole.Bikeradar
With the hub disc side up, count seven holes clockwise from the spoke in the disc side flange, then insert a spoke up through that seventh hole. Insert the spoke into the rim in the second eyelet clockwise from the valve hole. Screw a nipple on a couple of threads.
12] Count clockwise
Count another seven holes clockwise from the spoke in the non-disc side flange and then insert a spoke downwards through that seventh hole.: count another seven holes clockwise from the spoke in the non-disc side flange and then insert a spoke downwards through that seventh hole.Bikeradar
With the hub disc side up, count another seven holes clockwise from the spoke in the non-disc side flange and then insert a spoke downwards through that seventh hole. Insert the spoke into the rim in the eyelet that’s just clockwise from the valve hole. Screw a nipple on a couple of threads.
13] Repeat around the wheel
With the hub disc side up, put a spoke downwards in the hole two spaces clockwise from the one already downwards in the hub.: with the hub disc side up, put a spoke downwards in the hole two spaces clockwise from the one already downwards in the hub.Bikeradar
With the hub disc side up, put a spoke downwards in the hole two spaces clockwise from the one already downwards (see step 12) in the hub. Put the spoke into the rim four eyelets clockwise from the valve hole, lacing it over the spoke it crosses. Screw a nipple on and repeat this (apart from the spoke crossing) around the wheel. Each spoke should fit into the fourth eyelet clockwise from the previous one.
14] Complete the side
Complete this side of the wheel by inserting a spoke up through the flange two holes counter clockwise from the one already upwards in the hub.: complete this side of the wheel by inserting a spoke up through the flange two holes counter clockwise from the one already upwards in the hub.Bikeradar
Complete this side of the wheel by inserting a spoke up through the flange two holes counter clockwise from the one already upwards in the hub. Put the spoke into the rim three eyelets counter clockwise from the valve hole, lacing over the first two spokes and under the third. Screw a nipple on and duplicate this around the wheel with each spoke going into the fourth eyelet counter clockwise from the previous one.
15] Disc side down
With the hub disc side down, put a spoke in downwards, two holes counter clockwise from the one already downwards in the hub.: with the hub disc side down, put a spoke in downwards, two holes counter clockwise from the one already downwards in the hub.Bikeradar
With the hub disc side down, put a spoke in downwards, two holes counter clockwise from the one already downwards in the hub. Put the spoke into the rim three eyelets counter-clockwise, lacing it over the spoke it crosses. Screw a nipple on a couple of threads. Repeat this (apart from the spoke crossing) around the wheel with each spoke going into the fourth eyelet clockwise from the previous one.
16] Finish the job
Put the spoke into the rim four eyelets clockwise from the valve hole, lacing over two spokes and under a third.: put the spoke into the rim four eyelets clockwise from the valve hole, lacing over two spokes and under a third.Bikeradar
Complete this side of the wheel by inserting a spoke up through the flange two holes clockwise from the one already upwards in the hub. Put the spoke into the rim four eyelets clockwise from the valve hole, lacing over two spokes and under a third. Screw a nipple on. Duplicate this around the wheel with each spoke going into the fourth eyelet counter clockwise from the one previous.
Workshop Wisdom
To stop your spoke nipples dropping into a deep section rim, thread them backwards onto a spare spoke then feed them through into the rim.
Lacing wheels is just following a process, so the only skill is to be extremely methodical. It’s most important to not mix up the different lengths of spoke. Before you take each spoke from its relevant container, double check where it’s going on the hub.
Place the spoke nipples in a small container (an aerosol lid will do) and add a couple of drops of a good, thick oil (such as 3-in-1). Give them a good mix around then fish them out as needed. This lubricates the nipples so they turn more easily in the eyelets when you come to add tension.
Did enough research on wheel building so I am ready to convert a standard rear wheel into a Flip-Flop wheel with hub threads on both sides.
Remove the spokes one by one taking care not to mix the right side spokes with those of the left until they are all removed and the old hub and rim are separated.
Following the tips and instructions presented in the wheel building videos the Flip-Flop hub has been laced into our first Flip-Flop wheel. After lots of spoke tension adjustments we are finally satisfied that the wheel is true enough to fit to a bike.
Lifan LF-139F Forward drive sprocket for installation in Phatmoto bike:
Tsubaki Sprockets
SS35B12 SS35B13 SS35B14 SS35B15
MOTION INDUSTRIES INC. OTTAWA 1656 WOODWARD DR. Ottawa, ON K2C 3R8 Tel: (613) 723-6200 Fax: 1 613 723 6205
Spent the afternoon removing my new Phatmoto from GasBike.net from the packing box and assembling it, only thing left to do is install the engine.
Phatmoto Engine Mounting pattern: 162mm L x 75.5mm W - 80.5mm W (6.40" L x 2.95" W - 3.17" W ) Shaft rotation direction: Counterclockwise Sound rating (dB): 104 dB Start type: Recoil Product Height: 9 inches. Product Length: 12-1/2 inches. Product Weight: 37.5 lbs. / 17 kg Product Width: 14-1/2 in.
After installing the engine on my new bike from Gasbike.net I discovered to my sorrow that the right pedal interferes with the pull starter housing by at least 1/2 inches. If anyone else is having this problem you may be interested to know that I have found the solution, at least it solved my problem. I found that during manufacturing the crank shaft was inserted backwards in the bike frame. Because of the length of the protruding shaft the standard removal tool will not reach the retainer nut so I had to grind off the wrenching end and use a large pipe wrench to remove the retainer nut on each side of the shaft. Then insert the shaft the correct way around and tighten everything down.
Glad to report today that I was able to complete the very first test ride of my new bike and everything seemed to work well. I was however a little shocked at how while on electric power, the bike's speed spikes when the the electric throttle is closed and pedal assist kicks in....this is going to take a while to get used to.